VS Code
ioBroker adapter development using Microsoft Visual Studio Code (VSCode) based on the ioBroker.template adapter
Corrections, additions and changes are welcome!
This documentation was created without any prior experience using VS Code in conjunction with node.js/ioBroker. If the approach requires improvement, I would be grateful for any suggestions.
Pitfalls: If someone gets stuck and needs more in-depth information, please open an issue so that the documentation can be supplemented and refined.
The adapter name in the examples is iobroker.template-master-mhe .
Template
ioBroker Template Adapter: https://github.com/ioBroker/ioBroker.template
tested in the following environment
- ioBroker, installed locally
- ioBroker.js-controller: 1.0.0
- node.js: v6.10.2
- npm: 3.10.10
- Windows 10 Pro.
- VSCode 1.12.1
Accompanying information on adapter development in general and with VSCode
- ioBroker Forum: Debugging adapters with VS Code
- ioBroker Adapter Template on GitHub
- General information on adapter development in German: ioBroker AdapterDev User Meeting 2017.pdf by Apollon77 .
- ioBroker Adapter Development Documentation
- First steps in adapter development using a Webstrom IDE as an example
General procedure - Use a template for an adapter
1. Download template
- https://github.com/ioBroker/ioBroker.template#iobrokertemplate
- Perform step 1 there, e.g.: extract and save the template in a folder
2. Run "npm install" in the folder
- Installs the required npm modules in the copy of the template.
- The node-modules folder will be created anew in the template folder.
- https://github.com/ioBroker/ioBroker.template#iobrokertemplate
- Execute point 2 there.)
3. Grunt executed // changes the settings in the template in the existing project
- https://github.com/ioBroker/ioBroker.template#iobrokertemplate
- Execute point 3 there.)
- Install grunt globally if it's not already installed.
- Run in the terminal:
grunt rename --name=template-master-mhe --email=iobroker@digheim.de --author="Michael Herwig"
- Adapter name, author, and email address are changed at the necessary points in the code via Grunt.
4. Load the adapter folder into VS Code
- Adjust the folder name. Here, in this example, change ioBroker.template-master to iobroker.template-master-mhe
- VS Code: Open file/folder // or CTRL+K, CTRL+O
5. In VSCode, the template version was adjusted (from 0.5.0 to 0.0.2)
- Changed in io-package.json from 0.5.0 to 0.0.2 // used by ioBroker
- Changed in package.json from 0.5.0 to 0.0.2 // used by npm
6. Copied to ioBroker and path/name adjusted.
- Path: .../iobroker/node_modules
- Name: ioBroker.template-master-mhe
- https://github.com/ioBroker/ioBroker.template#iobrokertemplate
- (See point 5 there.)
7. Close the folder in VS Code
- VS Code: Close file/folder // or CTRL+KF
8. ioBroker/Admin -> Perform update
- Click on Update in the ioBroker Admin GUI.
9. Adapter selected and instance added.
-
In the ioBroker Admin GUI, click the plus sign next to the adapter.

-
The adapter instance is installed and displayed.
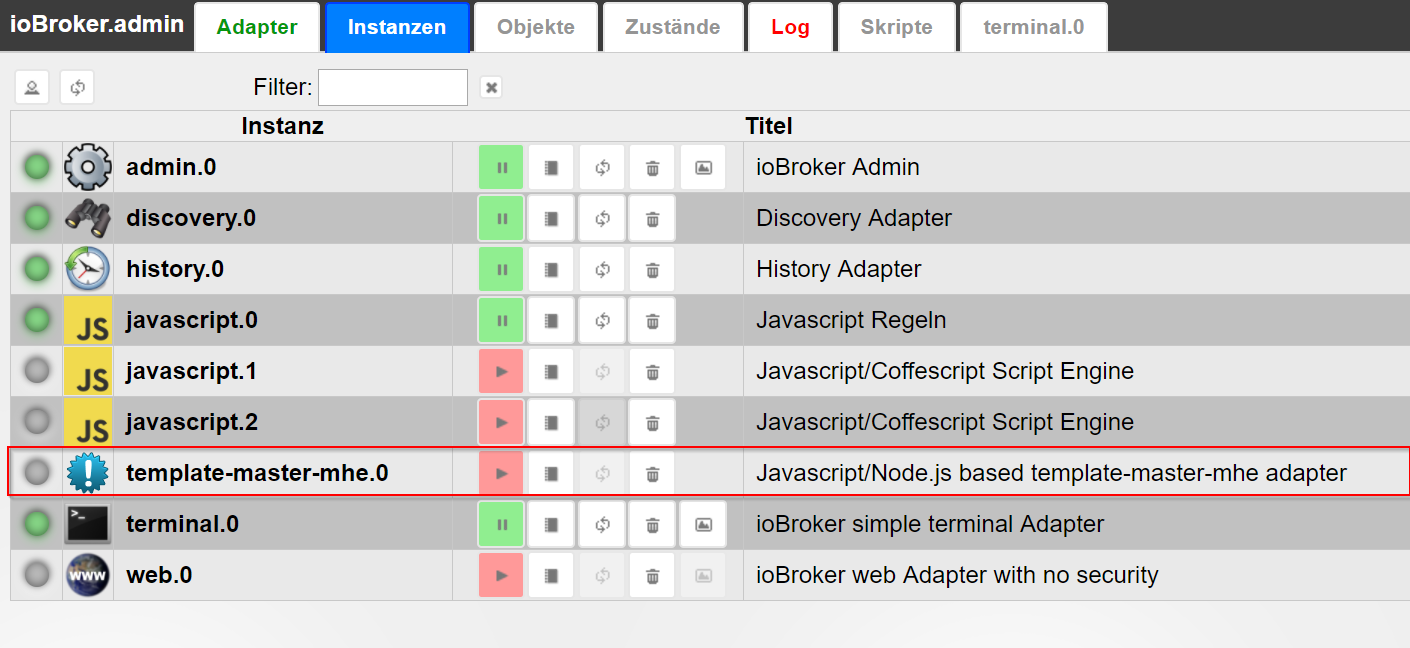
-
Stop the installed adapter to debug it.
10. Open the installed ioBroker folder in VS Code
- VS Code: Open file/folder // or CTRL+K, CTRL+O
- Select ../node_modules/iobroker.template-master-mhe
- Here the adapter can now be developed and debugged.
Debug
1.) Adjust VSCode launch.json
The settings must be configured once for all adapters.
- Press SHIFT+CTRL+P and then enter the following: >debug launch.json
- or via the surface: click on the beetle icon in the sidebar and then on the gear icon at the top.
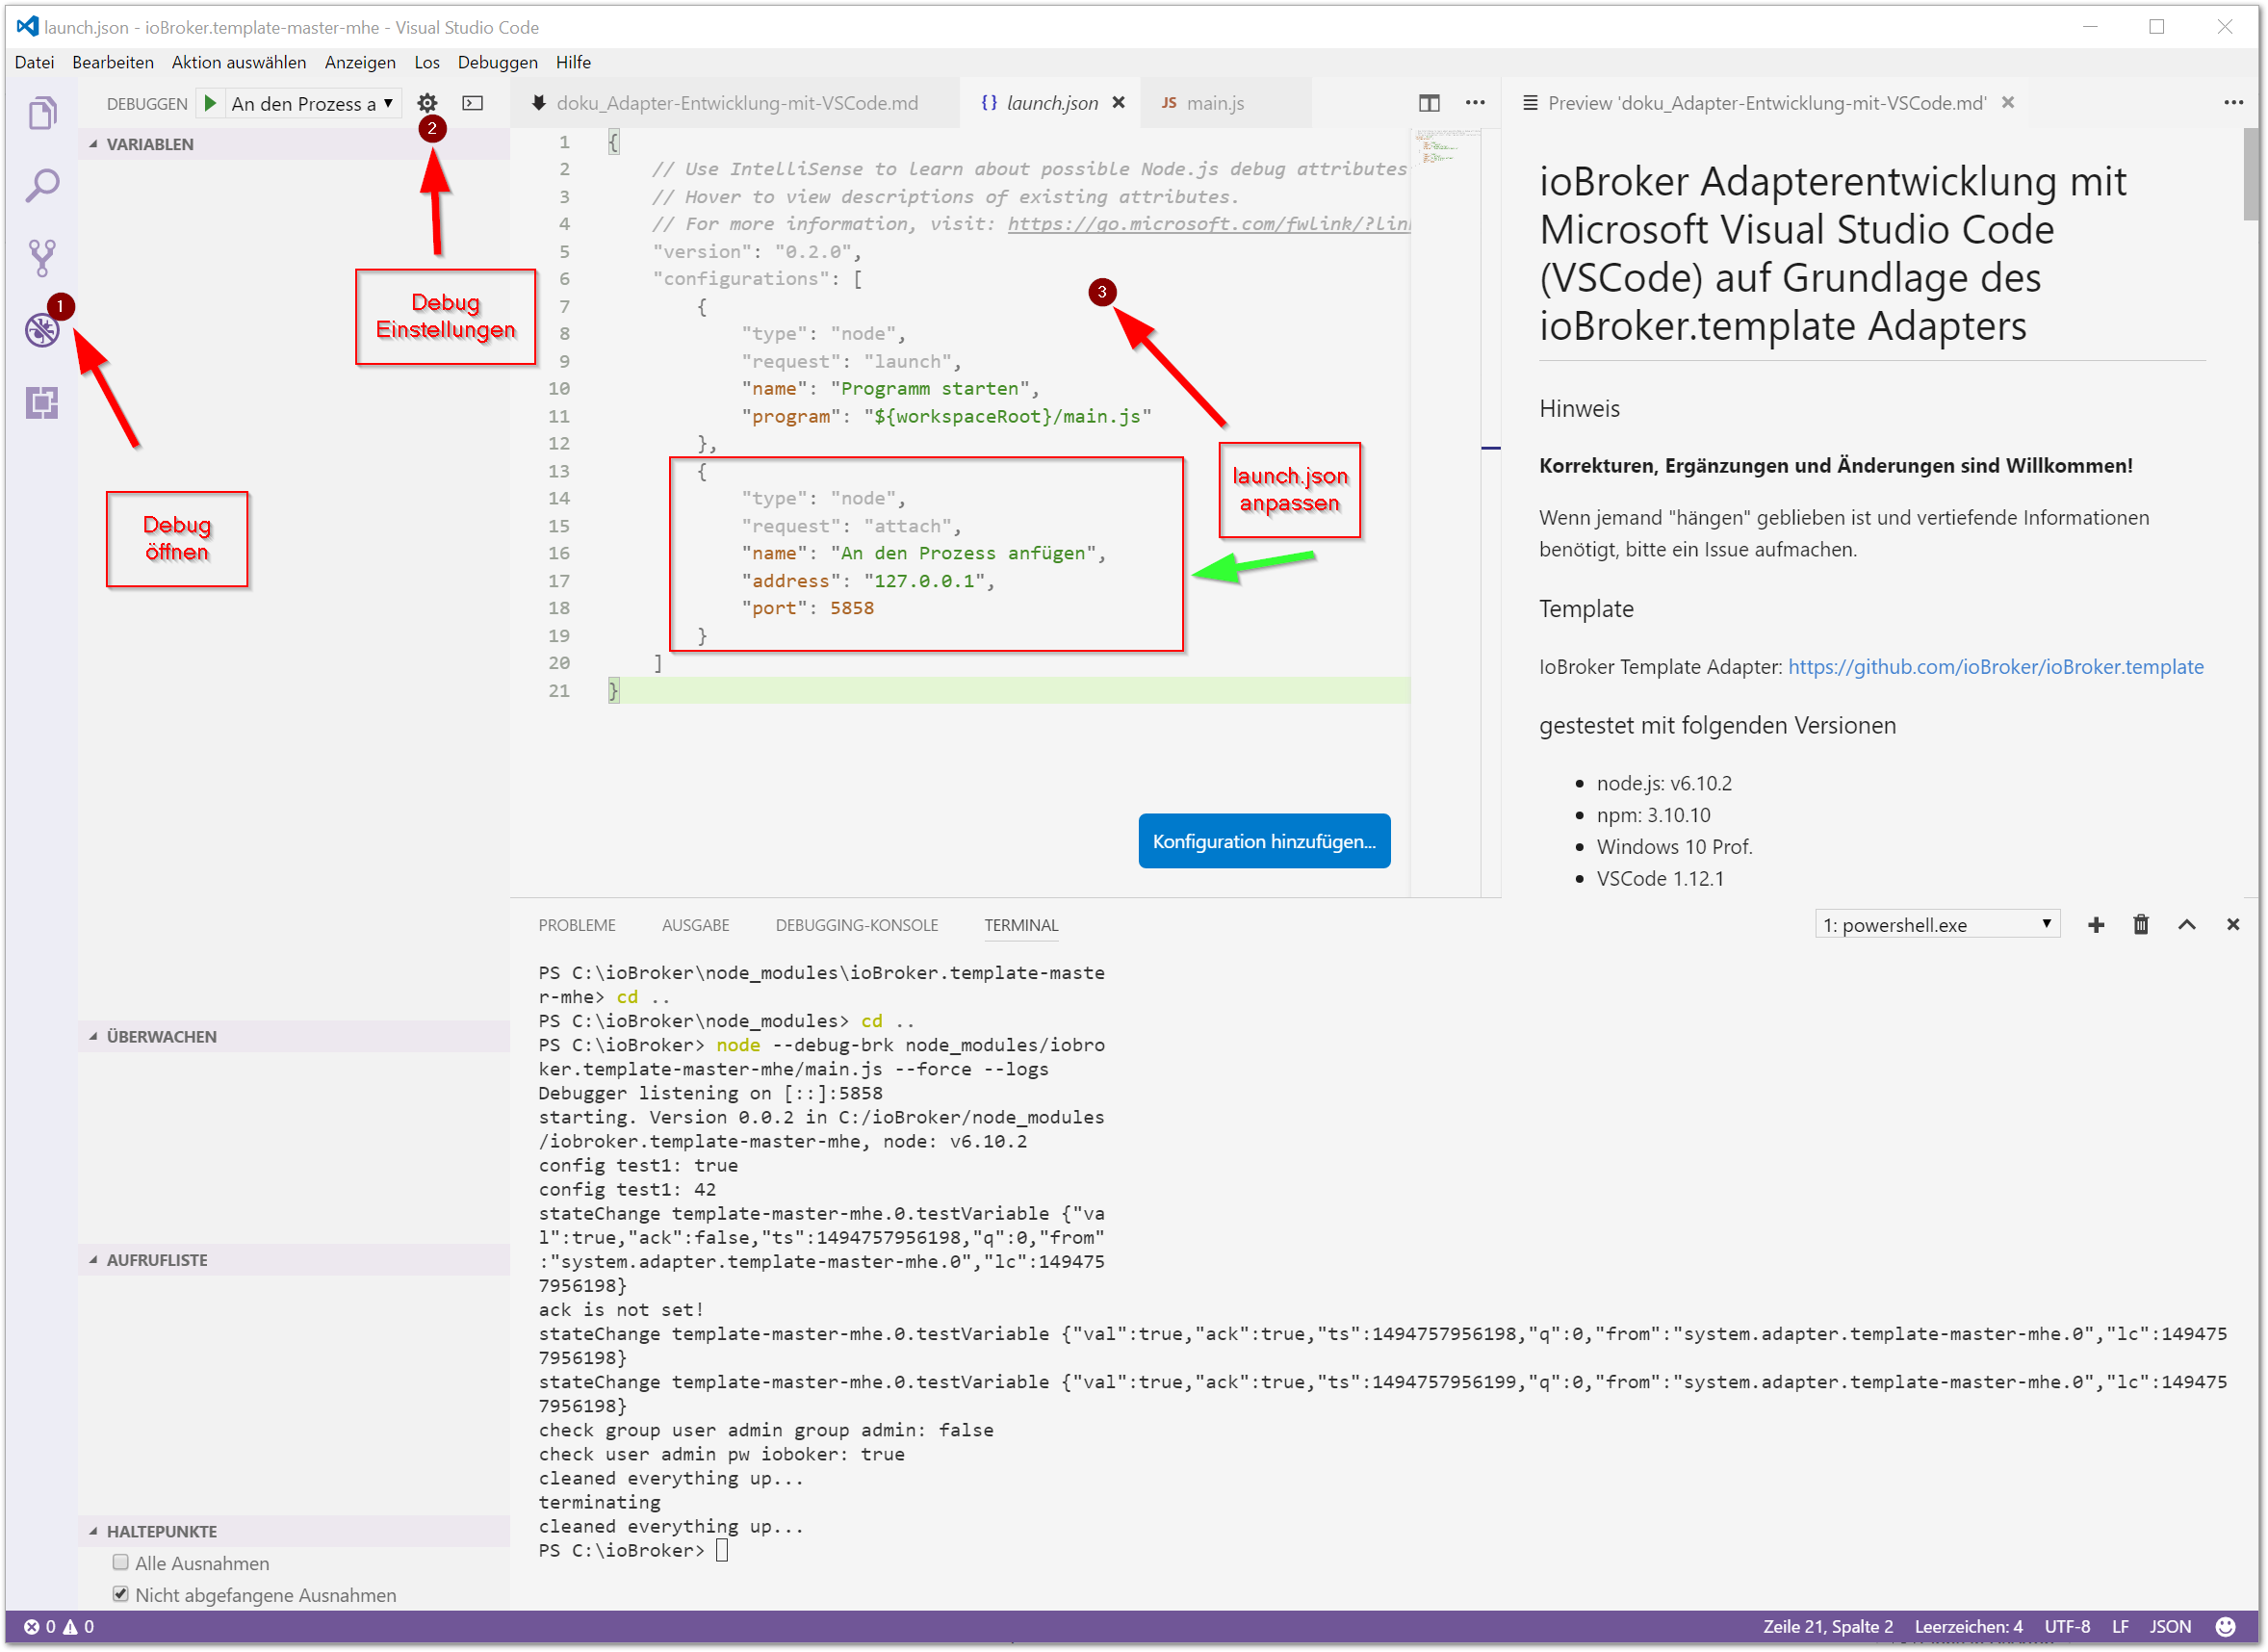
launch.json settings for debugging ioBroker adapters:
{
    // Use IntelliSense to learn about possible Node.js debug attributes.
    // Hover to view descriptions of existing attributes.
    // For more information, visit: https://go.microsoft.com/fwlink/?linkid=830387
    "version": "0.2.0",
    "configurations": [
        {
            "type": "node",
            "request": "launch",
            "name": "Programm starten",             // Name, der im VSCode Auswahlmenü neben dem grünen Play angezeigt wird
            "program": "${workspaceRoot}/main.js"
        },
        {
            "type": "node",
            "request": "attach",
            "name": "An den Prozess anfügen",       // Name, der im VSCode Auswahlmenü neben dem grünen Play angezeigt wird
            "address": "127.0.0.1",                 // Adresse, an dem der node.js Prozess läuft (bei Remote Debug, der Remote-Rechner)
            "port": 5858                            // Port, auf dem der node.js Debugger lauscht, der mit node --debug-brk ... gestartet wird
        }
    ]
}
- Remote debugging on a remote ioBroker is also possible. The IP address must then be changed from 127.0.0.1.
2.) Open the terminal and start the debugger.
-
CTRL+ö // opens the integrated terminal (the key combination depends on the operating system and VS Code version)
-
Stop the newly installed adapter in the terminal.
cd /opt/iobroker iobroker stop template-master-mhe -
Start the debugger in the terminal (for remote debugging, a connection via SSH must first be established in the terminal):
node --debug-brk node_modules/iobroker.template-master-mhe/main.js --force --logsWhere iobroker.template-master-mhe is the name of the adapter.
Display in the integrated terminal (Note: an external terminal program can also be used):
PS C:\ioBroker> node --debug-brk node_modules/iobroker.template-master-mhe/main.js --force --logs
Debugger listening on [::]:5858
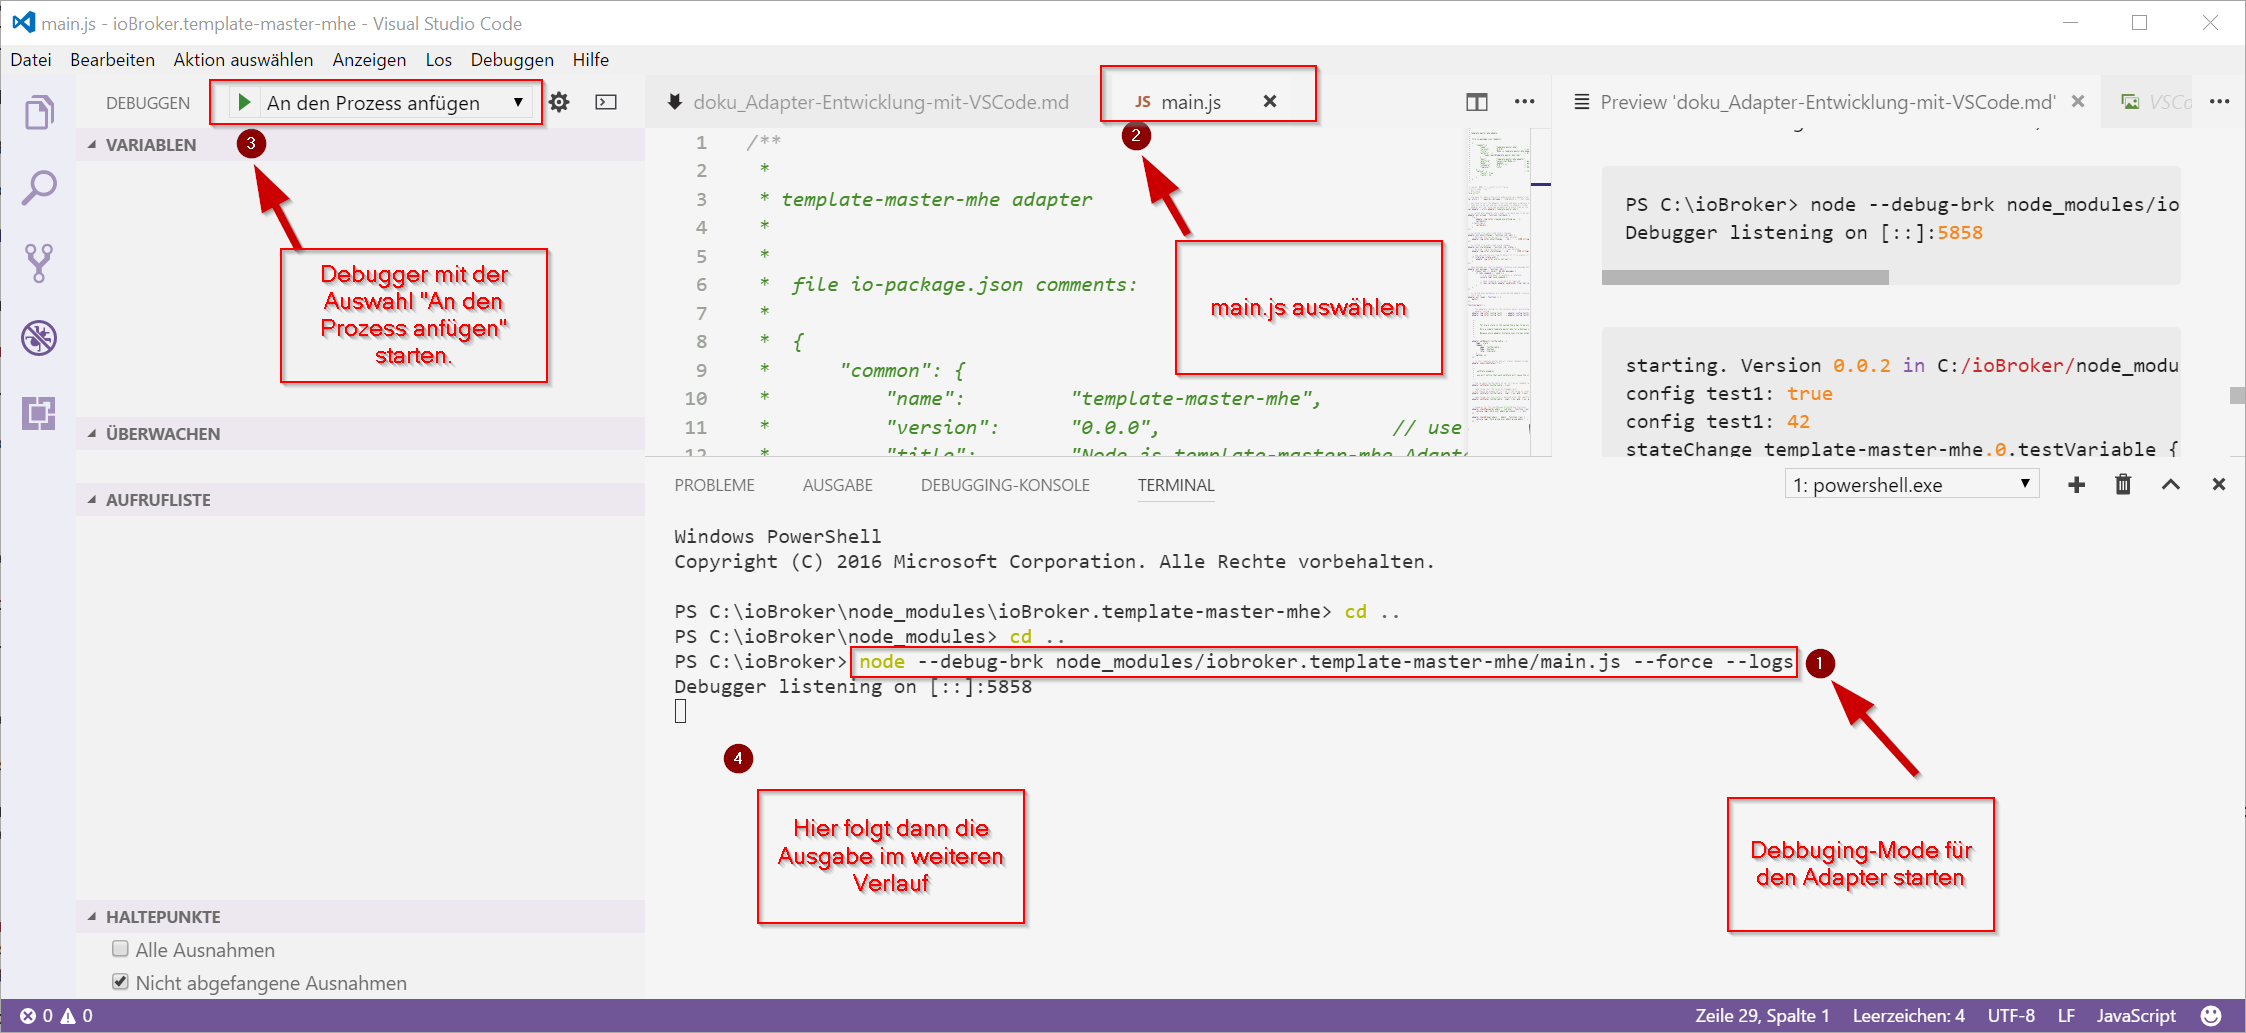
Output in the terminal after starting the debugger:
starting. Version 0.0.2 in C:/ioBroker/node_modules/iobroker.template-master-mhe, node: v6.10.2
config test1: true
config test1: 42
stateChange template-master-mhe.0.testVariable {"val":true,"ack":false,"ts":1494753342714,"q":0,"from":"system.adapter.template-master-mhe.0","lc":1494753342714}
ack is not set!
stateChange template-master-mhe.0.testVariable {"val":true,"ack":true,"ts":1494753342715,"q":0,"from":"system.adapter.template-master-mhe.0","lc":1494753342714}
stateChange template-master-mhe.0.testVariable {"val":true,"ack":true,"ts":1494753342715,"q":0,"from":"system.adapter.template-master-mhe.0","lc":1494753342714}
check group user admin group admin: false
check user admin pw ioboker: true
stateChange template-master-mhe.0.testVariable {"val":null,"ack":true,"ts":1494753367809,"q":0,"from":"system.adapter.template-master-mhe.0","lc":1494753367809}
- Cancel in the terminal with CTGF+C
Output in the terminal after stopping the debugger:
cleaned everything up...
terminating
cleaned everything up...
PS C:\ioBroker>
- In VS Code, go to Debug and under Debugging select "Attach to Process" and start the process.
- The output is performed in the Terminal tab of the integrated terminal.
- Cancel in the terminal with CTGF+C
Experiences
- The adapter icon of the template was adapted (renamed) according to Grunt, but is not displayed in ioBroker/Admin.
- The correct icon will only be displayed after the adapter is released.
to do
- Using VSCode with GitHub
- Example using a custom adapter
- Clarify: Is debugging only possible with node.js > 6.x or is 4.x also possible?
Documentation on the web
to Visual Studio Code
to node.js
to Git & Github
General Tips & Tricks
SSH with Windows
- Git for Windows - Download page installs the bash shell, which allows you to use SSH with the help of openSSH.
Miscellaneous
- My settings in settings.json for VS Code:
// Platzieren Sie Ihre Einstellungen in dieser Datei, um die Standardeinstellungen zu überschreiben.
{
    "window.zoomLevel": 0,
    "editor.minimap.enabled": true,                 // zeigt die kleine Codeübersichtskarte rechts neben dem Code an
    "editor.dragAndDrop": true,                     // ermöglicht markierte Codeteile per Drag und Drop zu verschieben0
    "workbench.editor.closeOnFileDelete": false,
    "files.autoSave": "afterDelay",                 // Auotmatisches Speichern der Dateien einstellen
    "files.autoSaveDelay": 1000,                    // Autosave nach 1000 ms
    "[javascript]": {},                             // Einstellungen für die SPrache "Javascript"
    "telemetry.enableCrashReporter": false,         //
    "workbench.colorTheme": "Quiet Light",          // Farbschema des Editors
    "telemetry.enableTelemetry": false,
    "workbench.iconTheme": "vs-seti",               // Icons für bekannte Dateieendungen. Wenn ja, welches Icon-Set soll verwendet werden
    "javascript.implicitProjectConfig.checkJs": true
}