Multihost operation
ioBroker is capable of distributing tasks across multiple servers. This allows the workload to be spread across several hosts.
Alternatively, you can also utilize system-specific extensions of a single-board computer (GPIO from a Raspberry Pi, even though the "main computer" is a more powerful Intel NUC).
Once a multi-host system is set up, all configurations are performed centrally by the administrator of the master host. The administrator of the slave host(s) is no longer accessible via their web interface(s).
It is therefore advisable to use a host with a minimal installation for a slave, i.e., only the js-controller and the admin.
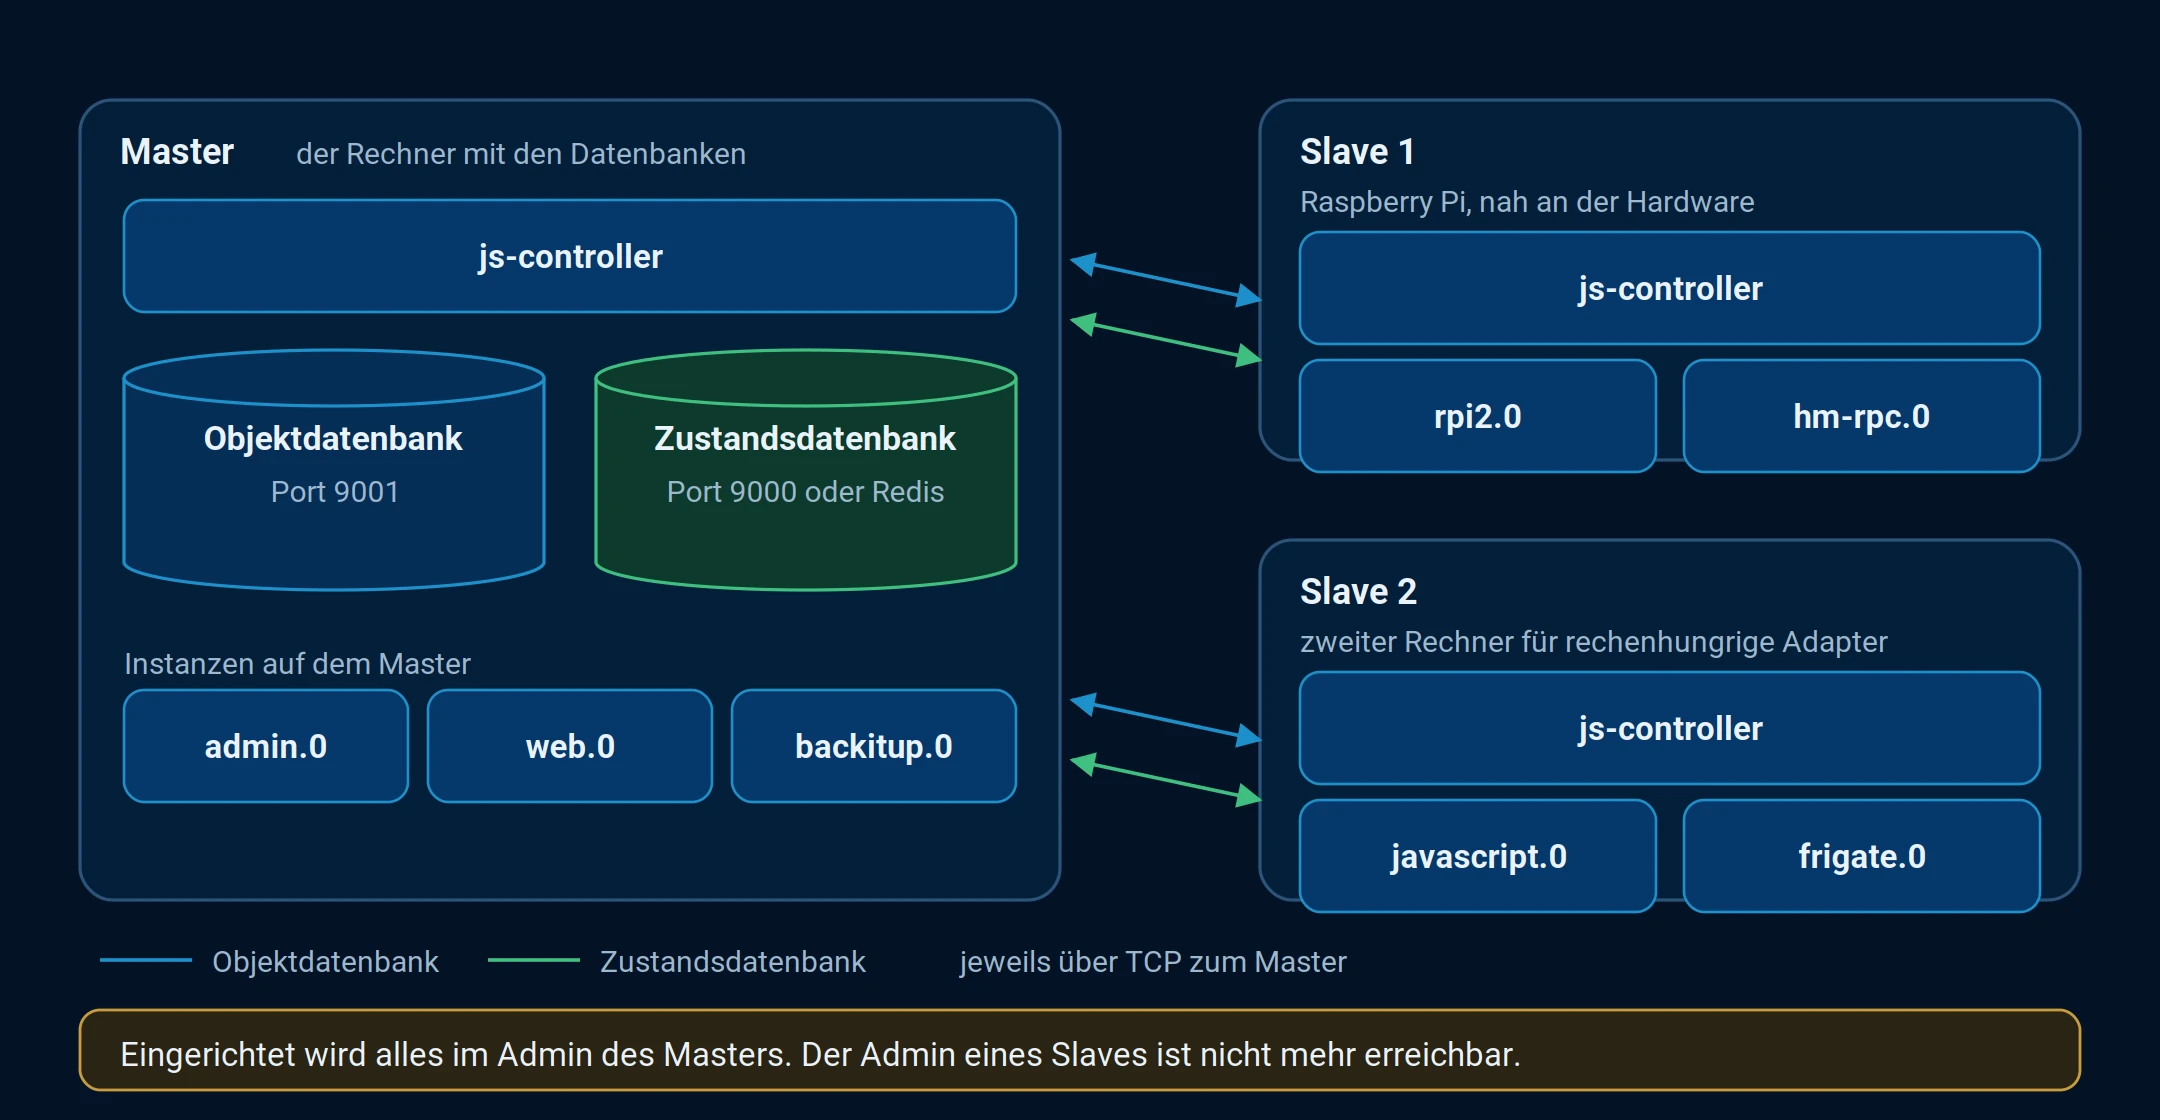
The databases reside on the master server. Each additional host brings its own JS controller and instances and accesses them over the network.
Installation
Master Configuration
Execute the following command on the master:
This step is absolutely necessary if Redis DB is in use. In other cases, it can be used if the automatic method (see below) fails. In that case, please select f (file) instead of r (redis)!
Please access via the console:
iobroker setup custom
Fill in the menu that now appears as follows
Type of objects DB [(j)sonl, (f)ile, (r)edis, ...], default [jsonl]: j
Host / Unix Socket of objects DB(file), default[0.0.0.0]:
Port of objects DB(file), default[9001]:
Type of states DB [(j)sonl, (f)file, (r)edis, ...], default [jsonl]: r
Host / Unix Socket of states DB (redis), default[127.0.0.1]: 0.0.0.0
Port of states DB (redis), default[6379]:
Data directory (file), default[../../../iobroker-data/]: /opt/iobroker/iobroker-data/
Host name of this machine [ioBroker-RasPi]:
iobroker multihost enable
enter pass phrase
iobroker restart
Slave Configuration
This step is absolutely necessary if Redis DB is in use.
Please enter the command via the console on the slave.
iobroker setup custom
Fill in the menu that now appears as follows
Type of objects DB [(j)sonl, (f)ile, (r)edis, ...], default [jsonl]: j
Host / Unix Socket of objects DB(file), default[127.0.0.1]: <MASTER-IP>
Port of objects DB(file), default[9001]:
Type of states DB [(j)sonl, (f)file, (r)edis, ...], default [jsonl]: r
Host / Unix Socket of states DB (redis), default[<MASTER-IP>]:
Port of states DB (redis), default[6379]:
Host name of this machine [raspi-sub-1]:
Finally, the following information appears:
creating conf/iobroker.json
iobroker multihost connect
and fill in the following dialogs accordingly:
1 |       <MASTER-IP> |  host |       192.168.86.42 | "authentication required"
Please select host [1]: 1
Enter secret phrase for connection: *****

Config ok. Please restart ioBroker: "iobroker restart"
iobroker restart
The newly created host will then also appear under Hosts on the main system.
If that doesn't happen, please reboot both hosts. First the master, then the slave.
Multihost with different subnets
If both ioBroker hosts are in different subnets, …
Example:
- Standard LAN (for PC, tablet, etc.) = 192.168.178.0/24
- IoT LAN (for Shelly, cameras, etc.) = 10.20.30.0/24
… the multi-host automatic setting (“iobroker multihost enable” and “iobroker multihost browse”) does not work, only the old method (iobroker setup custom) see above
Multihost with Redis
If a multi-host environment is to be installed where the states are stored in redis, there are still a few things to consider.
The redis.conf file on the host where the states are stored must be modified as follows.
nano /etc/redis/redis.conf
The line bind 127.0.0.1 contained therein must be supplemented with the IP address of the network adapter so that the Redis server allows connections from outside.
For example,
bind 127.0.0.1 192.168.1.10
Assuming that 192.168.1.10 is the local IP address of the ioBroker master.
This adjustment is only necessary on the master server.
Alternatively, you can also
bind 0.0.0.0
From Redis version 7 onwards, you also need to disable protected mode. To do this, you need to change the line
protected-mode yes
on
protected-mode no
change.
Finally, restart the Redis server or computer. For example:
sudo service redis-server restart
Distribute tasks
There are two ways to distribute the tasks across the hosts.
- If it is a new installation, select the host on which the adapter instance should be installed from the pull-down menu above the adapter list in the Adapter tab.
Then you add the instance there by clicking on the (+) in the right column.
- If you have already installed many adapters on a host, you can subsequently change the assignment of the already installed instances in the Instances tab.
Delete host
To delete a host, activate expert mode in the master's "Objects" tab of the Admin tab and select "host" in the "Type" column. Then delete the desired host.
Possible problems
Sometimes a message appears, similar to:
> ... bytes ... in strict mode
Then please edit the file containing this with the nano editor. Right at the beginning is 'use strict';; uncomment this line with // and save.
> IP Address of the host is 127.0.0.1. It accepts no connections. Please change.
if you haven't done §§YYYYYY_0§§ on the master system.