ioBroker adapter that talks the Panasonic Aquarea CN-CNT protocol directly over a serial line, without any HeishaMon module or MQTT broker in between. The heat pump's CN-CNT connector uses 5V TTL UART logic levels. A suitable level shifter is required when connecting it to a 3.3V UART, such as the Raspberry Pi GPIO UART. For long cable runs, an optional TTL/RS485 converter can be added because the protocol is half-duplex. Protocol decoding is based on insights from the HeishaMon project.
Status: Early release. Protocol library, simulator and adapter logic are complete in-process; field testing against a real heat pump is the next step.
Supported heat pumps
Panasonic Aquarea air-to-water heat pumps of the H, J, K and L series.
Installation
Install from the official ioBroker repository via the admin UI: open the Adapters tab, search for heishamon, and click install. Then add an instance under Instances.
Serial port prerequisites
These are host-side steps the admin UI cannot do for you:
- The ioBroker process user (
iobrokeron the standard Linux setup) must be allowed to open serial devices. On Debian/Raspberry Pi OS that means thedialoutgroup:groups iobroker # must contain 'dialout' sudo usermod -aG dialout iobroker # if not — then restart the whole ioBroker service - Use a stable device path so the port survives reboots and re-plugging. Prefer
/dev/serial/by-id/...over/dev/ttyUSB0:
On a Raspberry Pi GPIO UART the path is static anyway (e.g.ls -l /dev/serial/by-id//dev/ttyAMA2).
For wiring the heat pump, see Wiring below.
Configuration
| Setting | Default | Description |
|---|---|---|
device | /dev/ttyUSB0 | Path to the serial device the adapter opens. Must be readable by the ioBroker process. |
baudRate | 9600 | Panasonic Aquarea uses 9600 8E1 — do not change unless you use a custom transceiver. |
pollIntervalSec | 5 | How often the adapter polls the heat pump (seconds). |
extraPollEnabled | false | Polls the additional energy data block (K/L series only). Off by default — enable it only on a K/L pump; on H/J models the extra poll just times out. |
readOnlyMode | false | Passive listening only: do not send any polls or set commands, only decode frames from another master on the bus. |
Features
- Direct serial communication with Panasonic Aquarea heat pumps over the CN-CNT port. No HeishaMon hardware or MQTT broker required.
- 157 datapoints exposed as ioBroker states with proper roles, types and units.
- Set commands for all writable parameters supported by the CN-CNT protocol.
- Read-only mode for safe parallel operation alongside an existing HeishaMon installation (Phase-4 cut-over).
- Connection-quality statistics (frames in/out, CRC errors, timeouts) under the
info.*channel. - Optional extra data block for K/L series heat pumps (6 extra energy datapoints).
⚠️ Write-rate considerations
The Panasonic Aquarea controller's internal storage mechanism for settings is not documented. Normal use — manual changes, occasional smart-home automation — is very unlikely to cause wear; the HeishaMon community has years of operational experience without reported failures. However, high-frequency writes (e.g. a PID loop adjusting a setpoint every few seconds) could in theory exhaust an EEPROM cell over time if the controller is not using FRAM, MRAM, or a RAM-with-power-loss-flush design.
Avoid writing the same datapoint more often than every few minutes unless you have specific knowledge that your controller revision tolerates it. For closed-loop regulation, prefer a slow outer loop that drives the heat pump's own internal controllers rather than commanding the actuator directly.
What you need
No HeishaMon device, no ESP, no MQTT broker. This adapter talks the Panasonic CN-CNT protocol directly. The only thing you build is a serial connection between the heat pump and the machine that runs ioBroker (PC, home server, NAS, Raspberry Pi …).
Skill level — read this first. Setting this up means opening the heat pump's electronics cover and connecting two data wires plus ground to an internal connector. You should be comfortable with small-gauge wiring and basic electronics (logic levels, ground loops, RS485). It is low-voltage (5 V signalling), not mains work — but a wrong connector or reversed wiring can still disturb the heat pump. If that sentence makes you uneasy, this is not a good first electronics project.
⚠️ Entirely at your own risk and liability — no warranty. Opening the unit may void your manufacturer warranty. Power the heat pump off before wiring. Measure twice, connect once.
The signal, and the building block
At its core this is just a serial connection between the ioBroker host and the heat pump — nothing more exotic. The question is only how to physically run that link.
The heat pump speaks a plain 5 V TTL UART on its connector. The easiest way
to realise the link is a 5 V USB-to-TTL UART adapter: three wires only —
GND ↔ GND and the two data lines crossed (heat-pump TX → adapter RX,
heat-pump RX → adapter TX) — leave +5 V / +12 V unconnected. A pre-wired
PHR-4 pigtail into CN-NMODE makes this often solder-free.
Galvanic isolation is optional — but understand what is at stake. The heat pump's RX/TX pins may be wired directly to its microcontroller, with little or no protection in between. Excessive voltage or current on these lines — a ground / equalizing-current loop, a wiring slip, a +12 V pin brushed against a signal line — can destroy that microcontroller and leave you with a dead heat pump mainboard. If you are unsure about ground / equalizing currents between heat pump and host, a cheap USB isolator on the USB side removes that path. Otherwise protect the lines another way (e.g. series resistors or PTC fuses) — many installations run fine without any isolation, but that is a decision you make knowingly.
That bare adapter is fine only if the ioBroker host genuinely sits next to the heat pump — a bench test, or a small SBC mounted right at the unit.
Recommended setup — 2-wire RS485 over distance
In practice the ioBroker host is in another room or another floor, not 2 m from the heat pump. The sensible real-world link is therefore RS485 over a shielded twisted pair, which also matches the protocol's half-duplex nature:
heat pump (5 V TTL, CN-NMODE)
   └─ TTL↔RS485 converter        ← near the heat pump
        └─ shielded twisted pair, 120 Ω termination at BOTH ends, mind A/B
             └─ RS485↔USB adapter ← at the ioBroker host
                  └─ USB → ioBroker host  →  /dev/serial/by-id/…
You build the same TTL front end as above, but instead of running USB the full distance you convert to RS485 right at the heat pump and run two wires to the host. The small TTL↔RS485 converter boards cost only a few dollars from the usual online retailers and typically already carry basic line protection (TVS diodes / biasing resistors) — a welcome extra margin on the heat-pump side. Galvanic isolation remains optional and, if used, is simplest on the host USB side.
Whichever path you choose, the adapter only ever sees a local serial device path — continue at Configuration.
Other variants (advanced)
Raspberry Pi GPIO UART (ioBroker running on the Pi itself)
The Pi GPIO UART is 3.3 V, the heat pump is 5 V TTL, so a logic-level shifter is mandatory. The GPIO is also the natural host end of the RS485 run (RS485↔UART converter → level shifter → GPIO). Three steps:
- Pick a hardware UART and its pins. Use a real PL011, not the mini-UART on
ttyS0(its baud rate drifts with the core clock). On a Pi 4/5 the extra PL011s map to fixed GPIO pairs (TXD/RXD), e.g.uart2→GPIO0/1,uart3→GPIO4/5,uart4→GPIO8/9,uart5→GPIO12/13. Wire the heat-pump link (via the level shifter) to one of those pairs — crossed, plus GND. - Enable that UART in the boot config. Add
dtoverlay=uart3(or whichever you picked) to/boot/firmware/config.txt(older Raspberry Pi OS:/boot/config.txt) and reboot. - Find the matching device node. After reboot the UART appears as
/dev/ttyAMAx; confirm which node belongs to your overlay withdmesg | grep ttyAMAorls -l /dev/serial*, then enter that stable path in the adapter config.
See Wiring for the exact connector pinouts (CN-CNT and CN-NMODE).
Wiring
⚠️ Measure twice, connect once. Everything here is provided without any warranty and used entirely at your own risk and liability.
☠️ A wrong connection can kill the heat pump. The CN-CNT / CN-NMODE RX/TX pins may run straight to the heat pump's microcontroller, with little or no protection in between. Note the +5 V and +12 V pins sitting right next to the signal lines in the tables below: brushing +12 V onto a signal pin, a reversed wire, or a ground / equalizing-current surge can destroy that microcontroller and leave you with a dead mainboard. Double-check every pin before powering anything on.
The heat pump mainboard exposes two equivalent connectors that this adapter can use: CN-CNT and CN-NMODE. Either one works — pick whichever is easier to reach.
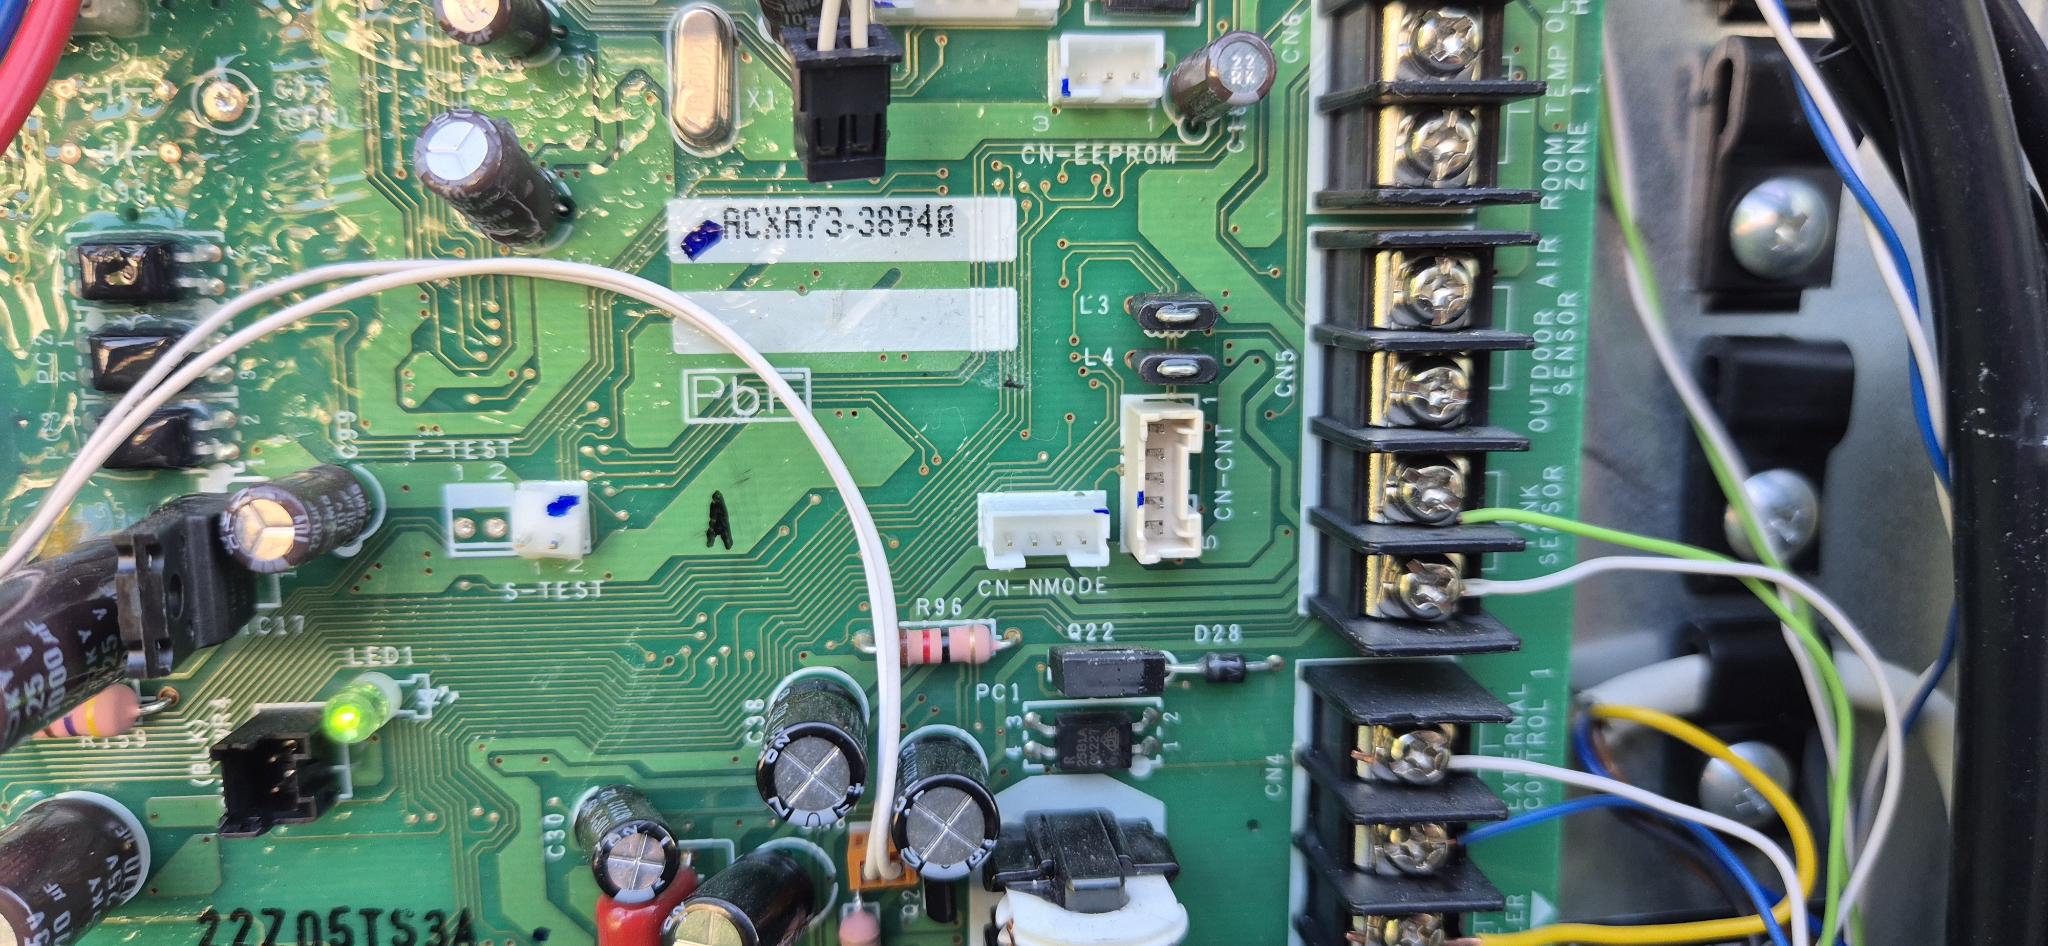
CN-CNT is the connector normally used for the CZ-TAW1 cloud module or the Optional PCB:
- If a CZ-TAW1 module is connected, run this adapter in read-only mode so it only listens and never drives the bus.
- With the Optional PCB present there are two bus masters, so collisions can occur — it should generally still work. After a CRC error the adapter waits a randomised time before the next bus access to break collision lock-step (see the response-driven bus notes in the changelog).
Both connectors carry a 5V TTL UART signal, so a level shifter is required for 3.3V hosts such as the Raspberry Pi GPIO. The signal names below are given from the heat pump's point of view — cross them at the adapter end (heat-pump TX → adapter RX, heat-pump RX → adapter TX).
CN-CNT — JST B05B-XASK-1 (mating connector PAP-05V-S)
| Pin | Signal |
|---|---|
| 1 | +5 V |
| 2 | TX, 5V level (from the heat pump) |
| 3 | RX, 5V level (to the heat pump) |
| 4 | +12 V |
| 5 | GND |
CN-NMODE — JST PH series (mating connector PHR-4, available pre-wired from the usual large online retailers)
| Pin | Signal |
|---|---|
| 1 | GND |
| 2 | RX, 5V level (to the heat pump) |
| 3 | TX, 5V level (from the heat pump) |
| 4 | +5 V |
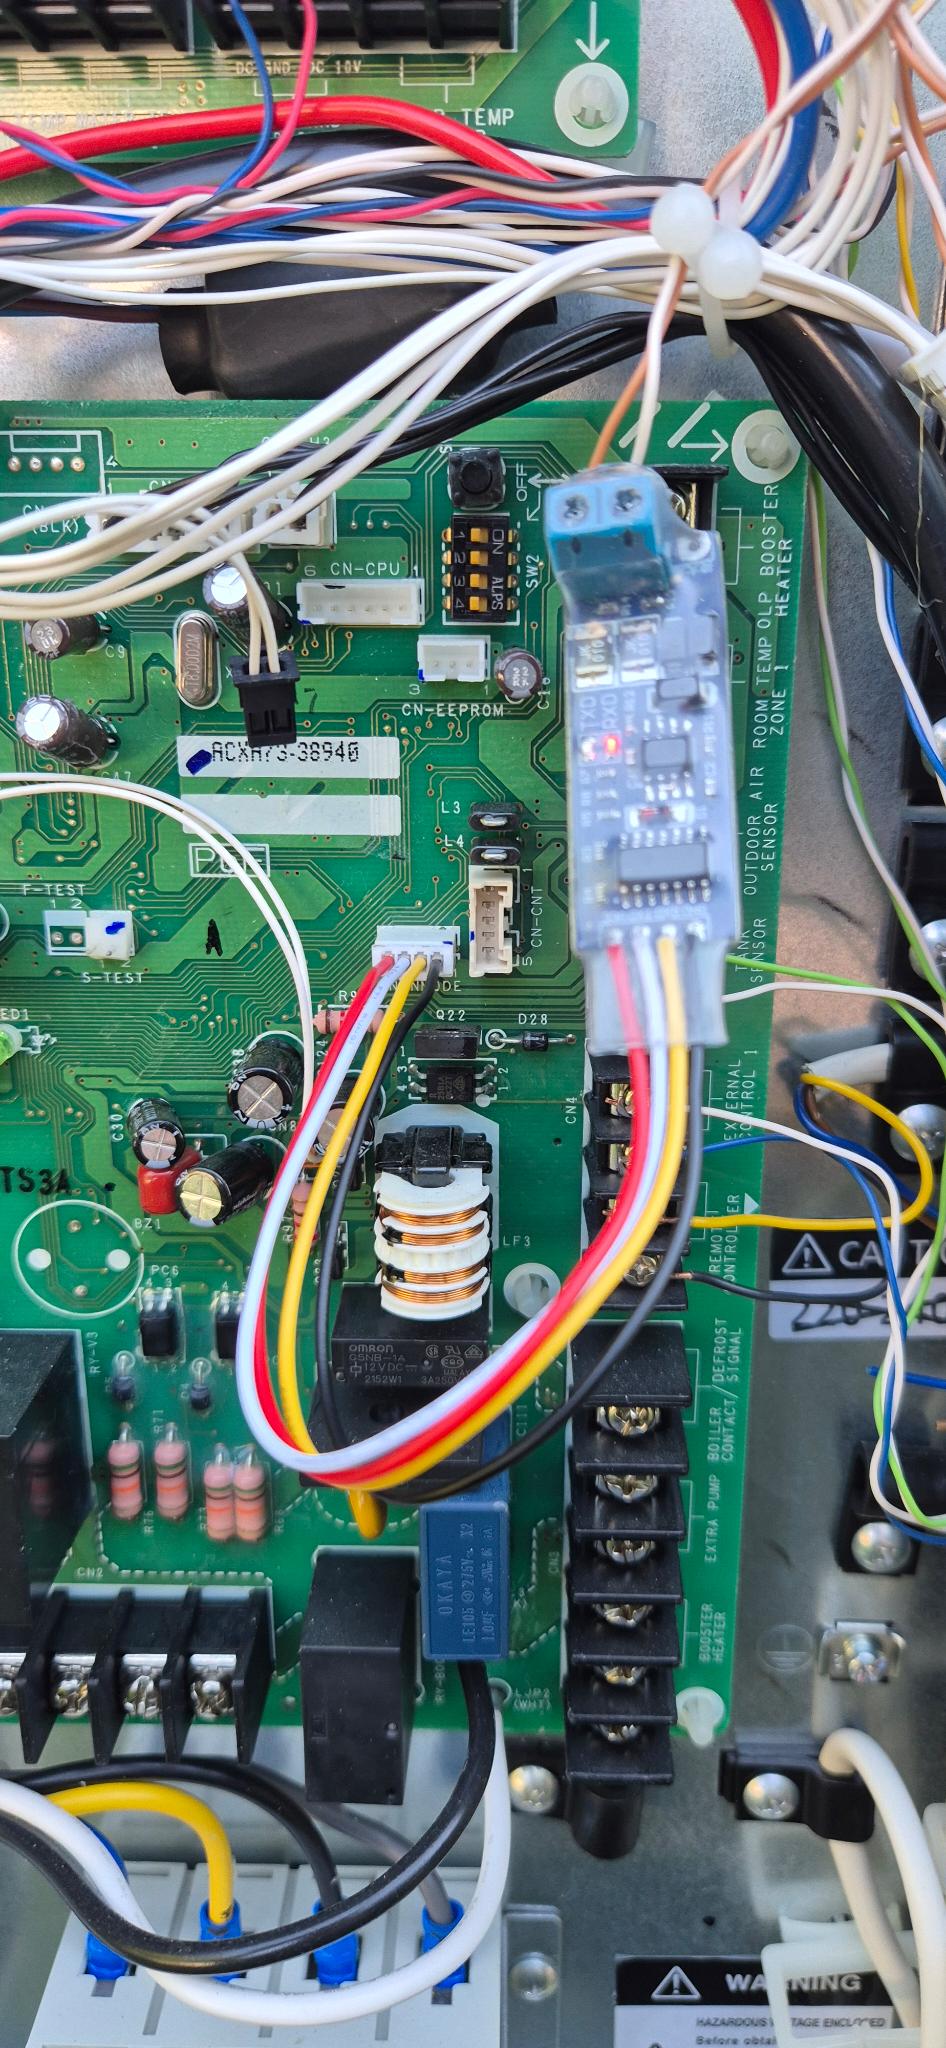
Example — a UART-to-RS485 converter wired to the CN-NMODE connector (the heat-pump end of the RS485 long-distance variant):
Troubleshooting
EACCESon the serial device — the ioBroker process user is not in thedialoutgroup. Aftersudo usermod -aG dialout iobroker, restart the whole ioBroker service (sudo systemctl restart iobroker), not just the instance — group membership only takes effect in a new session.- Adapter starts but no datapoints appear — check the wiring at the CN-CNT port (cross TX↔RX, connect GND, mind the 5 V TTL levels, see Wiring). With a TTL↔RS485 converter, also check A/B polarity and the termination resistors. A healthy link fills ~157 datapoints under
heishamon.0.main.*within a few seconds and setsheishamon.0.info.connectiontotrue. - Set commands have no effect —
readOnlyModeis a deliberate safe default for the first start. Disable it only once the read path runs cleanly. - Connected via the CZ-TAW1 bus — keep the adapter in
readOnlyMode, otherwise it causes bus collisions with the Panasonic cloud module.
Documentation
Project documentation lives under docs/:
- docs/plan/ — phase plan and roadmap.
- docs/protocol/ — CN-CNT protocol analysis.
- docs/decisions/ — architecture decision records.
Credits and upstream licensing
Protocol decoding builds on the work of the HeishaMon community. The CN-CNT register map and many implementation hints originate there.
At the time of writing, the HeishaMon repository carries no explicit license file — no LICENSE, no header in the sources, no clear statement in the README. Under US and EU copyright law, this defaults to "all rights reserved", so we cannot copy or directly port the original code. To stay clean:
- The HeishaMon C++ sources serve only as a reference for understanding the Panasonic CN-CNT protocol.
- This adapter is a clean-room TypeScript reimplementation: we read the upstream sources, distilled the protocol into docs/protocol/, and implemented from that documentation — not from the original code.
- The HeishaMon repository's protocol documentation files (
MQTT-Topics.md,OptionalPCB.md,ProtocolByteDecrypt.md) describe an observable physical protocol — that is factual information and not subject to copyright; they are cited as sources where relevant.
The CN-CNT protocol itself is not published by Panasonic; what HeishaMon discovered is empirical observation. Facts are not copyrightable, but the specific C++ implementation of those discoveries is.
Changelog
0.0.14 (2026-06-29)
- (Tobias Hanss) Corrected the maintainer email address in the package metadata (
package.json,io-package.json) - (Tobias Hanss)
extraPollEnablednow defaults to off (opt-in) — the K/L-series extra data block is only polled when explicitly enabled, so a fresh install never polls datapoints that H/J pumps cannot provide. Existing instances keep their current setting - (Tobias Hanss) Documentation: reworked the hardware/wiring section — clarified that only a plain serial link is needed (no HeishaMon device), made 2-wire RS485 the recommended real-world path, added a Raspberry Pi GPIO UART step-by-step, and a dead-mainboard warning at the wiring pinouts
0.0.13 (2026-06-28)
- (Tobias Hanss) Release now uses npm trusted publishing (provenance via OIDC) on Node 24 — fixes repository-checker E2008/E3019/E3022
- (Tobias Hanss) Removed the redundant
mochadev-dependency (it ships with@iobroker/testing) — E0063; the CIadapter-testsjob now declaresneeds: check-and-lint— E3014 - (Tobias Hanss) Lint-config cleanup: dropped
.prettierignorein favour of// prettier-ignoremarkers on the datapoint tables — W0084/W5048. No functional change
0.0.12 (2026-06-28)
- (Tobias Hanss) Resilient startup: a failed serial open no longer terminates the adapter — it stays alive, sets
info.connection=falseand retries - (Tobias Hanss) Polling reworked to a setTimeout-at-end-of-tick scheme so poll ticks can never overrun or pile up in the wire queue, even under sustained communication failure
- (Tobias Hanss)
validateConfig()now validates and safely clamps the user-configurable timeouts/gaps (responseTimeoutMs,setCommandGapMs,sendMaxRetries) to the Node.js timer ceiling - (Tobias Hanss)
infochannel name fully translated (all 11 languages); setup help texts clarified - (Tobias Hanss) Documentation: folded the install notes into the README and removed the separate INSTALL.md
- (Tobias Hanss) Tooling: adopted the standard ioBroker test-and-release workflow (testing-action-check / -adapter / -deploy) and migrated to
@iobroker/eslint-config. No change to the heat-pump protocol
0.0.11 (2026-06-21)
- (Tobias Hanss) Object state roles for writable datapoints are now
levelinstead ofvalue(thevaluerole requireswrite=false), fixing the repository checker's object-structure errors (E1011) - (Tobias Hanss) State objects are now updated on upgrade (
extendObject) so existing installations pick up the corrected roles - (Tobias Hanss) Added the recommended i18n translations for the
info.connectionstate name (W1001)
0.0.10 (2026-06-21)
- (Tobias Hanss) Published from CI with npm provenance (signed build attestation). No change to the adapter itself
0.0.9 (2026-06-21)
- (Tobias Hanss) CI: the release workflow's npm-publish step is now idempotent — it skips publishing when the version is already on npm, so a manual publish no longer makes the tagged release run fail. No change to the adapter itself
0.0.8 (2026-06-20)
- (Tobias Hanss) Maintenance for ioBroker repository acceptance: adapter-managed timers for clean shutdown, Node.js >=22 required, CI runs the adapter tests on Linux, Windows and macOS. No functional change to the heat-pump communication
0.0.7 (2026-05-30)
- (Tobias Hanss) Response-driven half-duplex bus: every send now waits for the heat pump's reply (or a timeout) before the next frame goes out, and retries up to 3 times on timeout or CRC error
- (Tobias Hanss) After a CRC error a randomised backoff precedes the next bus access to avoid lock-step collisions with a second master (Option-PCB)
- (Tobias Hanss) New "Diagnostics" setting toggles the set-command response logging (off by default)
0.0.6 (2026-05-30)
- (Tobias Hanss) Diagnostic logging to reverse-engineer the heat pump's SET acknowledgement: logs the sent frame and the heat pump's reply (frame type, timing, hexdump) at info level
0.0.5 (2026-05-30)
- (Tobias Hanss) Wire-queue gap is now enforced between every pair of sends, including across idle periods (previously the gap only applied while multiple tasks were already stacked in the queue — so polls and isolated sets bypassed it entirely)
- (Tobias Hanss) Queue is hard-capped at 100 pending entries; overflows are logged at warn level and the dropped send is skipped instead of silently piling up
0.0.3 (2026-05-26)
- (Tobias Hanss) Serialize all wire writes through a FIFO queue with a configurable inter-frame gap (default 200 ms). Fixes lost set commands when a script writes several datapoints at once
- (Tobias Hanss) Pump_Duty / Max_Pump_Duty unit removed (raw value 65-254, no physical unit)
0.0.2 (2026-05-25)
- (Tobias Hanss) Lower Node.js engine requirement to >= 20 (was 22) so the adapter installs on current ioBroker LTS hosts
0.0.1 (2026-05-25)
- (Tobias Hanss) Initial adapter release
License
MIT License
Copyright (c) 2026 Tobias Hanss t.dev@familie-hanss.de
Permission is hereby granted, free of charge, to any person obtaining a copy of this software and associated documentation files (the "Software"), to deal in the Software without restriction, including without limitation the rights to use, copy, modify, merge, publish, distribute, sublicense, and/or sell copies of the Software, and to permit persons to whom the Software is furnished to do so, subject to the following conditions:
The above copyright notice and this permission notice shall be included in all copies or substantial portions of the Software.
THE SOFTWARE IS PROVIDED "AS IS", WITHOUT WARRANTY OF ANY KIND, EXPRESS OR IMPLIED, INCLUDING BUT NOT LIMITED TO THE WARRANTIES OF MERCHANTABILITY, FITNESS FOR A PARTICULAR PURPOSE AND NONINFRINGEMENT. IN NO EVENT SHALL THE AUTHORS OR COPYRIGHT HOLDERS BE LIABLE FOR ANY CLAIM, DAMAGES OR OTHER LIABILITY, WHETHER IN AN ACTION OF CONTRACT, TORT OR OTHERWISE, ARISING FROM, OUT OF OR IN CONNECTION WITH THE SOFTWARE OR THE DEALINGS IN THE SOFTWARE.